- Thank you for purchasing our EZ-Pack battery kit. Please read this instruction sheet through to the end before starting to assemble your EZ-Pack. Here are a few tips that will help insure the assembly process goes smoothly. Start with a clean non-electrically conductive, flat and level work surface that is well lit. If you use reading glasses, wear them. Lay out your parts so the components are easy to reach and organized in the sequence you will need them. If your cells are not clean, make them so by using compressed air, wiping with solvent, or whatever it takes. You will need a T-15 Torx driver with a screwdriver handle for the case screws.
DO NOT USE A POWER IMPACT DRIVER TO TIGHTEN THE CASE SCREWS!
The torque is too high and the screws will strip out of the plastic case. We do not replace cases with stripped screw holes on warranty. If you have a lot of EZ-PACKS to assemble, you may use a battery drill on low speed which has a clutch type driver function set to a torque low enough that it stops driving when the screw bottoms. We set our “Makita” drill/driver on “7”, though your drill may require a different setting. Start low and adjust upward one click at a time until there is just enough force to drive the screw. There is no purpose in over-tightening the case screws, because we just want the gap between cases closed.
- Practice fitting a battery contact into a case half enough times that you become adept at it.
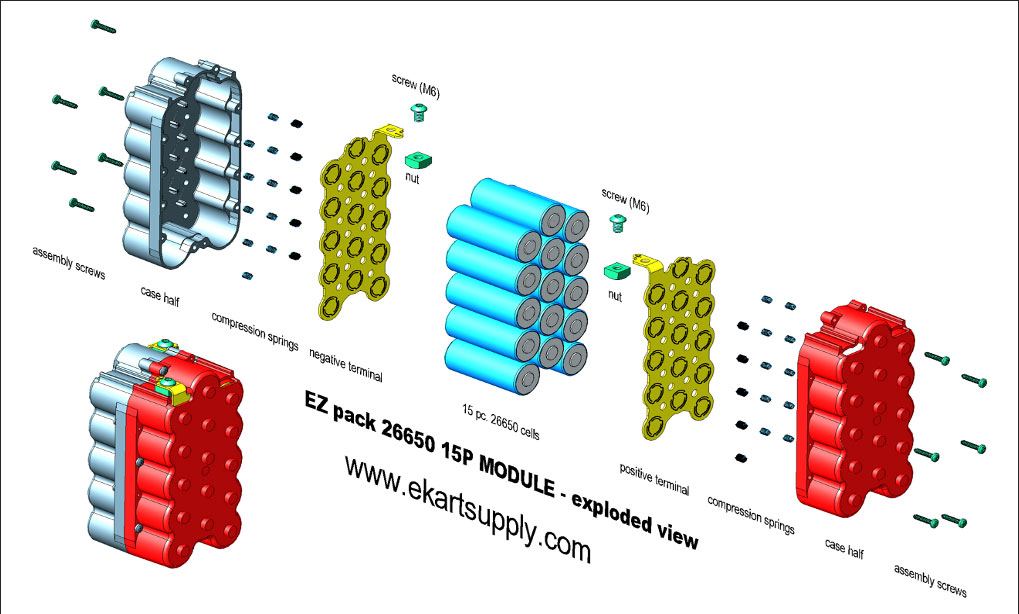
- Place a gray (negative) case half open side up on the table and insert a spring into each spring pocket, 15 in all. We provide a few extra in case one is dropped and lost.
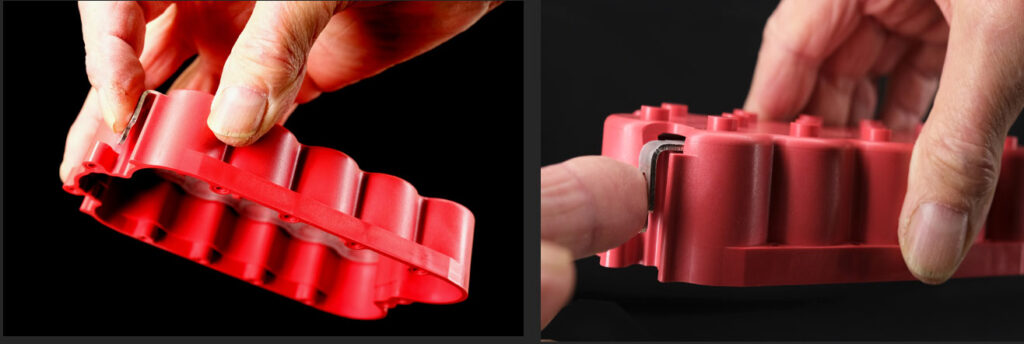
- While holding the case half firmly on the table, carefully install a negative battery contact over the springs, taking care not to knock any springs out of their pockets. This takes a little practice but after a few tries becomes easy.
- Inspect the contact surface to ensure there is no dirt, dust or hair that might interfere with the cells making a good electrical connection. If it’s not spotlessly clean, press the terminal firmly down onto the springs and blow out any foreign particles with some clean compressed air.
- One by one, place a cell (negative end down) on the contact. Again, it’s important that there is no foreign material (such as hair or dirt or small pieces of packing material from the battery packaging) that could get between the cell and the EZ-pack contact.
- Once all 15 cells are loaded, check and clean (if need be) the positive contact surfaces of the cells.
- Next, prepare a red (positive) case half with it’s springs and contact. Inspect for cleanliness.
- Now, this is the tricky part….using one hand press the contact down against the springs and pick up the case half. Using your other hand, grasp the case half by the sides and firmly press on the exposed terminal with your index finger as in the picture. If you do this correctly and with enough force, the contact will stay in place and hold the springs in their pockets as you invert the case. If you lack the hand strength to do this, it can be accomplished by using both hands.
- Now, set the positive case half in place over the previously assembled negative side.
- While holding the case half down firmly with one hand, insert two screws diagonally opposite each other. Tighten one screw until the gap between case halves is about 1/8” on that side and then tighten the opposite screw to close the gap. Go back to the first screw and tighten it until the gap is closed. Now, install the other 4 screws and snug them all. At this point, there should be no open gap between the case halves that you could put a .020” (.5mm) feeler gauge in. If the case halves have not pulled together completely then it may be that you have let a spring come out of it’s pocket. You will have to disassemble and start again. In that case you may need to spend some time straightening a damaged contact.
- If the gap is closed, flip the cell pack over, install the other 6 screws and snug them down.
- Congratulations, you have just assembled an EZ-Pack! With a little practice, the entire process can be done in under 5 minutes. I routinely assemble them in lees than 4 minutes.
- Tip: note that the terminal nuts have a small radius along two sides and the other two sides have sharper corners. If you install the nut with its’ radius edge parallel with the rib on the case, it’s easier to install and fits better.